Vault Cockroachdb
How to use HashiCorp Vault to issue and renew certificates for CockroachDB authentication
By default CockroachDB (CRDB) uses digital certificates for authentication and encryption. If you are considering using CRDB in production you might want to manage certificates with HashiCorp Vault (Vault) to be able to scale database nodes and clients. Most databases authenticate users with a username and password. Digital certificates provide stronger authentication and fit into the “3 Rs” of enterprise security: Repair, Repave, and Rotate. Vault makes the process of issuing, renewing and revoking certificates a lot easier. Both tools are designed for a cloud environment. If you like reading code more than you like reading blog posts then I recommend cloning the git repository. Read on if you want to know more about CRDB, Vault and certificate management.
 CockroachDB
Depending on your availability requirements you could choose between single instance Postgres, HA Postgres or CockroachDB (Postgres protocol compatible). All three solutions support digital certificates and TLS encryption. You might ask yourself “do I really need a cloud-native database?”.
Single instance Postgres
You could just run a single instance Postgres database. Assuming you regularly perform a backup and both the Recovery Point Objective (RPO) and the Recovery Time Objective (RTO) are low, this might be your best solution. It is easy and simple to manage. However, it doesn’t give high availability while upgrading your kernel or your database during maintenance. Worse, downtime is inevitable in case of a failure.
HA Postgres
Postgres has a number of ways to make the database highly available all with different RPO and RTO trade-offs. Most of the solutions rely on the network and assume there is only one master node at any point in time. Furthermore, these solutions don’t cover the “split-brain” problem. It requires a human to correctly decide whether or not a failover should take place to prevent having two master nodes running. Some solutions lose data in the event of a failover.
CRDB
In CRDB every node is a master and it can handle a split-brain scenario using the Raft protocol. CRDB is designed to have an RTO of 4.5 seconds in the event of a disk failure or datacenter-level disaster. By default CRDB holds 24 hours of every table history in the system and you can query that data using time-travel. This allows you to read the data at a certain point in time with the “AS OF SYSTEM TIME” SQL query syntax.
Pets vs Cattle
In a cloud environment we should treat our nodes as cattle as much as possible. Cattle is easy to scale and doesn’t require special treatment to recover in the event of a failure. A database server that assumes one master node, implies that these servers need to be treated as pets. In CRDB every node is a master and therefore all nodes can be treated as cattle. Your queries can be distributed across all of the nodes in the cluster. This means that adding more nodes to the cluster increases capacity, speed and reliability. It does force you to plan for data-locality to prevent high latency. CRDB is not a silver bullet. The devs at Cockroachlabs also make trade-offs to be able to scale the database over multiple regions. Some of the features of a traditional database simply don’t scale and might never be supported. Fortunately there is very good documentation on which features will and won’t be supported.
CRDB Other Features
Besides the availability, CRDB has a couple of unique features. These are my personal favourites:
- Very good documentation on how to operate and migrate a database cluster
- A dashboard with near-realtime performance statistics of your SQL queries
- Zipkin and Jaeger traces
- Runs on Kubernetes and Mesos
- Support for multi-cloud / multi-region / on-prem deployments
- Change Data Capture to stream database changes via WAL to a Kafka cluster
- A LOT of prometheus metrics and preconfigured alerts
- Flywaydb support
- Blazing fast startup time for the CRDB Docker image which speeds up local-development
- JUnit runner
If you are considering CRDB as an alternative to Postgres you might want to read a more detailed comparison by ObjectRocket.
How CRDB authentication works
By default CRDB uses digital certificates instead of a username and password for authentication. Digital certificate are considered less vulnerable to phishing, keystroke logging and man-in-the-middle (MITM) attacks. CRDB has three entry points that require authentication:
An SQL client querying one or more databases it was granted access to
CRDB recommends using digital certificates to authenticate users. However, it is still possible to authenticate systems / users with username and password. By default a TLS 1.2 connection will be used to authenticate the database client on port 26257. This is compatible with the Postgres wire protocol.
A user accessing the Admin UI dashboard
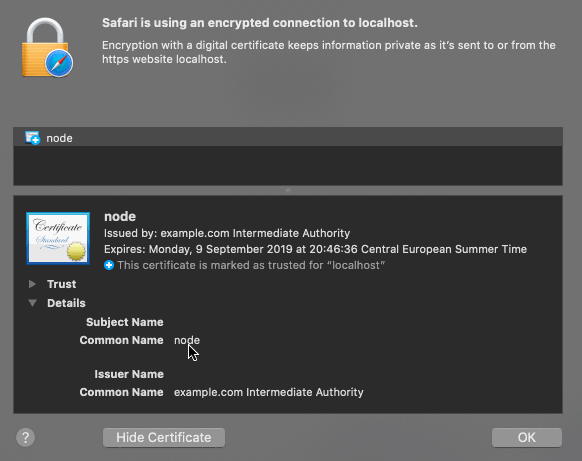
The above image shows the certificate for the dashboard in a browser. The certificate is issued by “example Intermediate CA” and the common name is “node”. The Subject Alternative Name (SAN) has the value “roach1”. The domain name (localhost) doesn’t match the SAN and the Intermediate CA is not trusted by the browser. Therefore the browser will show a warning when opening the dashboard. By default the dashboard can be accessed over an HTTPS connection on port 8080.
You can provide the cockroach binary with a server certificate for the HTTPS connection to prevent a browser warning. By default users are created without a password. You have to create a password for every user / system that has authorized access to the dashboard. The same user account is used for querying the system and accessing the dashboard. Once authenticated, the user can only see information about the databases he was granted access to.
A database node joining a cluster
If you run a secure cluster, a new node needs to authenticate itself with a digital certificate. Obviously you don’t want some random node to sync your precious data to it without strong authentication. So be careful not to provide an SQL client with this kind of privilege. The default port for internal traffic (to synchronize database nodes) is the same as a the port that is used by SQL clients. To join a cluster a node needs to present a certificate with specific properties.
Digital certificates are verified using a chain of trust. The trust anchor for the digital certificate is the root certificate authority (CA). Most operating systems and browsers ship with a couple of predefined CA’s that are trusted. You could request one of those CA’s to sign your certificate request. However, it would be tedious to manually request a client certificate every time you want a node to join the cluster (or the certificate for the node expires). It becomes really annoying when every new SQL client needs a certificate. To automate this process there are two options:
The cockroach cert command can be used to create a chain of trust. You could use openssl to generate all the client certificates. In practice it’s a lot easier to use the cockroach cert create-ca, cockroach cert create-node and cockroach cert create-client commands to automate this process. These commands provide the properties on the certificates that are required by a cockroach cluster to authenticate. All of these commands require you to have the CA certificate and private key present when issuing a certificate. In general it is not considered a good practice moving the private key of the CA around your infrastructure.
Use an existing CA if your company already has one. Digital certificates are signed with a private key. When using an existing CA, the third party or system is responsible for safely storing the private key to issue the digital certificates. When you want a new client to access the CRDB cluster, you should create a certificate with the correct properties and send a Certificate Signing Request (CSR) to the existing CA. The existing CA should respond with a digitally signed client certificate that can be used for authentication.
 Vault
Vault
Since CRDB is a cloud-native database, nodes and clients come and go. These nodes and clients use certificates for authentication. Issuing and rotating digital certificates can be a painful process. This might lead to long-lived certificates to postpone the pain of renewing or rotating them. It is also hard to keep a centralized view of the certificates issued to SQL clients (and when they will expire). Some developers will tell you “if it hurts, do it more often”. I consider this to also be true for issuing digital certificates. Vault allows you to automate a lot of the procedures around issuing, renewing and revoking digital certificates. This has the added benefit that you can respond quickly in the case of an emergency or when a certificate expires. Short-lived, single-purpose secrets generally reduce the attack surface of your infrastructure.
Vault can handle different types of secrets like passwords, SSH keys, database credentials and certificates. It simplifies a lot of the operational burden when it comes to issuing, rotating and retrieving secrets. In the CRDB use-case both an SQL client and a database node can have multiple certificates. Certificates expire and in some cases they need to be revoked. Vault keeps a database of all the certificates it has issued. You can can use this database to batch operations like revoking specific certificates. The tool also provides an audit log to track abuse and detect anomaly patterns.
The PKI secrets engine can integrate with your existing CA. It can also act as an intermediate CA. This allows you to delegate the issuing, revocation, rotation and expiration of the database credentials to Vault. The tool integrates with existing authentication and authorization protocols, which allows you to mix and match. For example, you could use LDAP authentication to grant a database client access to a database. It provides a standardised API to support short-lived secrets.
Demo time
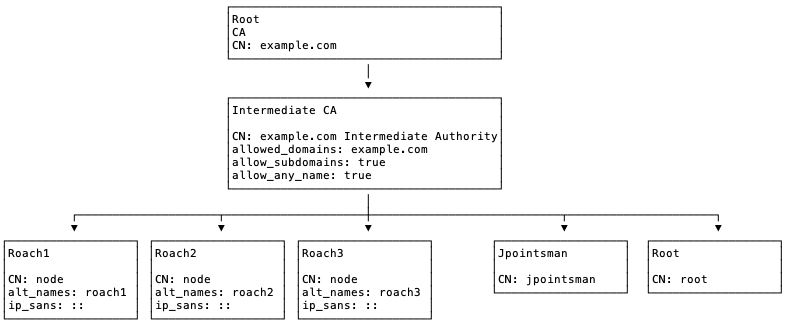
The following steps will demonstrate how to generate the certificates for CRDB database nodes. The above image shows the chain of trust for the demo setup. A docker-compose file is used to start a vault and a cockroach cluster:
git clone https://github.com/rinokadijk/vault-cockroach.git
cd vault-cockroach
docker-compose build
docker-compose up
The docker-compose file starts 1 Vault node in server mode and 3 CRDB nodes in server mode. The CRDB nodes discover each other through the docker network bridge (hostname: roach1, roach2 and roach3). Both the Vault and CRDB binary implement a server as well as a client. The vault-init-client container and roach-client container are running in client mode. The following diagram shows the relation between the containers in the example.
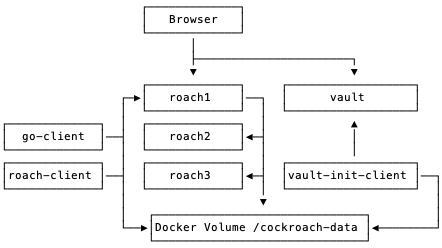
In this example the client containers (vault-init-client and roach-client) are responsible for generating and distributing the certificates through Docker volumes. In a production setup it might be more convenient to extend the CRDB container with logic to request new certificates and revoke old certificates. Most of the logic in the example is in the vault-init-client container. It is responsible for bootstrapping the Vault container and initializing the PKI secrets engine. The next sections will explain the responsibility of each container in more detail.
vault
The vault container is based on the official Vault Docker container running the Vault server on port 8200 with TLS disabled. The CA data, Intermediate CA data and all issued certificates are stored in this instance. Vault is configured with the UI enabled and a filesystem storage backend. The config is stored in the /vault-config volume mapping. The data and logs are available in the /vault-data volume mapping.
roach1, roach2 and roach3
The roach1, roach2 and roach3 containers are based on the official CRDB Docker containers. A shell script waits for the CA.crt to become available before starting a cluster with the –secure and –join argument. The –join argument is used to discover the other CRDB nodes. The roach1 node is not provided with a –join argument to init the cluster immediately. However, in a production scenario you must provide the –join argument for all nodes and explicitly trigger the init command to bootstrap the cluster. If you forget to add the –join argument, the node might act as if it were a single node cluster on reboot.
You should also consider using something like Consul Template to discover and configure your nodes as cattle. The roach1 node exposes the dashboard and sql server on port 8080 and 26257. The other nodes don’t expose any ports to avoid clashes. In a production scenario you would expose port 8080 and 26257 and use a load balancer to distribute load across all nodes. The certificates are generated by the vault-init-client container and shared through a Docker volume (/cockroach-data/roachX). Certificates are read from the Docker volume.
vault-init-client
A custom image based on the official Vault Docker container with jq and curl installed to simplify the extraction of certificates from vault API responses. This instance is responsible for using the Vault client to initialize and unseal the Vault server. Once unsealed it uses the root token to generate a CA, Intermediate CA and Digital Certificates for roach1, roach2, roach3 and roach-client. It shares the certificates with the other images through a shared Docker volume (/cockroach-data/roachX and /cockroach-data/roach-client).
Let’s have a more detailed look at the init-certificate-chain.sh script which is used by the vault-init-client container.
The first step is to check if we should initialize and unseal Vault:
IS_INITIALIZED=$(vault status | grep Initialized | awk '{ print $2 }')
IS_SEALED=$(vault status | grep Sealed | awk '{ print $2 }')
The script assumes that a new chain of trust must be created when the Vault is initialized for the first time. Both initializing Vault and creating a new chain of trust should only be done once. To be able to create the chain of trust the PKI secrets engine must be enabled with a role that is allowed to enable the PKI backend:
vault login ${ROOT_TOKEN}
vault secrets enable pki
In a production setup a policy and an auth method should be created to restrict access. However, for this demo the root token is used for all of the Vault configuration. By default the PKI secrets engine is enabled at /pki. You might want to create a separate chain for nodes and SQL clients. The -path option allows you to specify a custom path (e.g. /pki/cockrach/nodes). Next we tune the secrets backend to expire everything within 10 years after issuing:
vault secrets tune -max-lease-ttl=87600h pki
After this we create a root private key and certificate with the maximum time to live. The common name (CN) property on the certificate will be example.com. The CN is the most precise naming element on the certificate and is used to identify the owner of the certificate. In this case the owner will be the self-proclaimed domain administrator for example.com. To create the CA and save the result to disk issue the following command:
vault write -field=certificate pki/root/generate/internal common_name="example.com" ttl=87600h > CA_cert.crt
The write command can be used to add properties to the PKI configuration. The write command overwrites all properties for a path whereas the tune command modifies specific properties, but leaves other properties untouched. Now issue the following command to change the CRL distribution endpoint:
vault write pki/config/urls issuing_certificates="http://127.0.0.1:8200/v1/pki/ca" crl_distribution_points="http://127.0.0.1:8200/v1/pki/crl"
The crl_distribution_points property indicates that the certificate revocation list will be published on /v1/pki/crl. If you point your browser to http://localhost:8200/v1/pki/crl you will receive a list of all the certificates that have been revoked. Next, we have to create a separate secret engine to issue certificates with a max TTL of 5 years in order to provide CRDB with the Intermediate CA certificate, a node certificate and its corresponding private key. Jq is used to extract the certificate signing request (CSR):
vault write -format=json pki_int/intermediate/generate/internal common_name="example.com Intermediate Authority" ttl="43800h" | jq -r '.data.csr' > pki_intermediate.csr
The output of the command above is a certificate signing request. Vault can sign the request with the CA private key. The intermediate CA will have the CN “example.com Intermediate Authority”. Let’s sign the CSR for the intermediate CA to create a chain:
vault write -format=json pki/root/sign-intermediate csr=@pki_intermediate.csr format=pem_bundle ttl="43800h" | jq -r '.data.certificate' > intermediate.cert.pem
The output of this command is a certificate file that we should send to Vault. If your company already has a CA, the PEM certificate should be provided by the administrator of the company CA. We can upload the signed certificate to Vault with the following command:
vault write pki_int/intermediate/set-signed certificate=@intermediate.cert.pem
Vault allows you to optionally provide a PEM file which contains both the CA and the intermediate CA (pem_bundle parameter). This allows a client to verify the chain of trust until the root. CRDB nodes don’t seem to verify the complete chain, therefore we leave it like this (sql client might validate the complete chain if they use the verify-ca option). Now we have to set which properties can be signed by the intermediate certificate. Let’s configure the intermediate CA:
vault write pki_int/roles/example-dot-com allowed_domains="example.com" allow_subdomains=true allow_any_name=true max_ttl="720h"
This allows the example-dot-com role to issue certificates for the example.com domain. Typically the intermediate certificate would only be used for subdomains of example.com. However, CRDB requires the CN property on the node certificate to have the value “node” and therefore we have to allow_any_name. The max_ttl restricts all certificate issued by the intermediate CA to expire within 720 hours. This forces us to rotate the certificate for a node every 30 days. Next we can ask Vault to generate a new certificate for a node with the following command:
vault write -format=json pki_int/issue/example-dot-com common_name="node" alt_names="roach1" ip_sans="::" ttl="720h" > /cockroach-certs/vault_response.json
The common_name for all nodes in the CRDB cluster must be “node”. The alt_names and ip_sans should reflect the hostname and ip address of the node in the cluster. The ttl must not exceed the 720 hours we specified when creating the example-dot-com role. Vault will respond with the CA that signed the certificate, the private key and the certificate itself. All three files can be extracted with jq from the Vault response. The files need to be placed in the cockroach cert directory when starting a cockroach node with the –certs-dir argument. The private key of the CA remains in Vault. The directory layout of the certs-dir for every node must be:
certs-dir/
 ca.crt
 node.crt
 node.key
To be able to query the database we have to create a new user and grant access to a database. The common_name for an SQL client must match the username. It is highly recommended that your application supports rolling upgrades (or at least can reload the certificate without downtime) because of the expiration date on the certificate. The following command generates a new certificate and key for the user jpointsman:
vault write -format=json pki_int/issue/example-dot-com common_name="jpointsman" ttl="24h"
roach-client
The roach-client container is based on the official CRDB Docker container. It uses the CRDB client with the root account to create a Dashboard UI user. Certificates are read from the volume. The certificates are generated by the vault-init-client container and shared through a Docker volume (/cockroach-data/roach-client). For the CRDB client the certificates should have the names corresponding to the username with a “client.” prefix. The directory layout of the certs-dir for every node must be:
certs-dir/
 client.jpointsman.crt
 client.jpointsman.key
To run the sql-client example issue the following command:
docker-compose run roach-client sql --user=jpointsman --execute="show databases;"
go-client
The example comes with a go-client which uses the certificates at the Docker volume to authenticate:
const (
	host        = "roach1"
	port        = 26257
	user        = "jpointsman"
	dbname      = "jpointsmandb"
	sslrootcert = "/cockroach/cockroach-data/ca.crt"
	sslkey      = "/cockroach/cockroach-data/client.jpointsman.key"
	sslcert     = "/cockroach/cockroach-data/client.jpointsman.crt"
	appname     = "go-client"
)

psqlInfo := fmt.Sprintf("host=%s port=%d user=%s "+
		"dbname=%s sslmode=require ssl=true sslrootcert=%s sslkey=%s sslcert=%s application_name=%s",
		host, port, user, dbname, sslrootcert, sslkey, sslcert, appname)
db, err := sql.Open("postgres", psqlInfo)
To run the go-client example issue the following command:
docker-compose run go-client
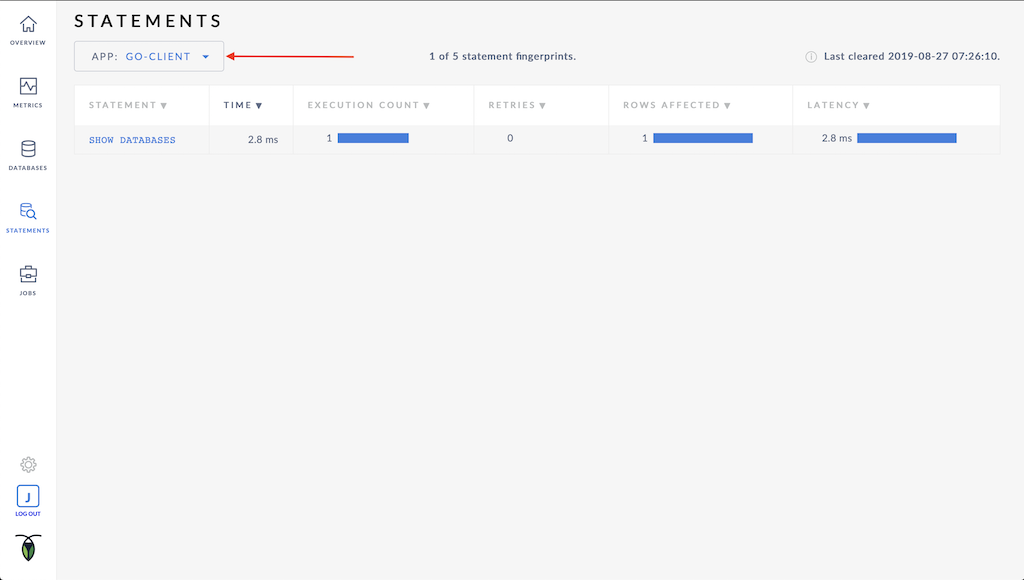
The image below shows the statements tab of the dashboard that were executed by the go-client.
Renewing certificates
Renewing your node and client certificates is really easy. To renew all the certificates run the following command:
docker-compose up -d vault-init-client
This command will use vault in client mode to generate new certificates for nodes roach1, roach2, roach3 and for users root and jpointsman. The existing certificates will be overwritten. The vault-init-client skips initializing and unsealing the Vault if the Vault is initialized. To reload the certificates without downtime run the following command:
docker-compose kill -s SIGHUP roach1 roach2 roach3
You can check the certificate dates with the following command:
echo | openssl s_client -connect localhost:26257 2>/dev/null | openssl x509 -noout -dates
Conclusion
Modern cloud-native solutions like Kubernetes, Istio, CRDB and Vault use digital certificates for authentication. Short-lived certificates prevent bad certificates to continue to live on for years after being mississued and revoked. CRDB is designed to run in the cloud and be resilient to failures. Vault allows you to automate and manage certificates for CRDB. Hopefully the docker-compose example helps you getting started using digital certificates.
»